 |
John Uftring (@chargepositif) |
Bamboo is a commonly used wood for a variety of products, such as cutting boards and drink coasters, and many people find that they like having their bamboo items personalized. I was spurred into action by a post by another LMA member who showed off an engraving that had light, medium, and dark engraved areas, but was not a photograph.
At the end of the article I have included links to some of the products I used. I use LightBurn on an Apple MacBook Pro 13 M1 (2020), or a MacBook Air 13 (2017) so the screen captures below may look different from your version of LightBurn. Photographs of the final results were taken and edited with my iPhone 7 Plus (no special apps).
To increase the appeal and potential value of the personalized bamboo product on offer, you can add another shade, or color if you will, to the engraving process. This is achieved easily by adding a new layer or layers to the artwork design so that different different speeds and/or power levels can be applied to portions of the artwork.
Our challenge is finding the speed/speeds and power levels that translate to the different shades/colors that we desire. LightBurn makes the discovery phase easier by providing an easy to access and use “Material Test” feature. The material test feature is accessed through the “Laser Tools” menu:

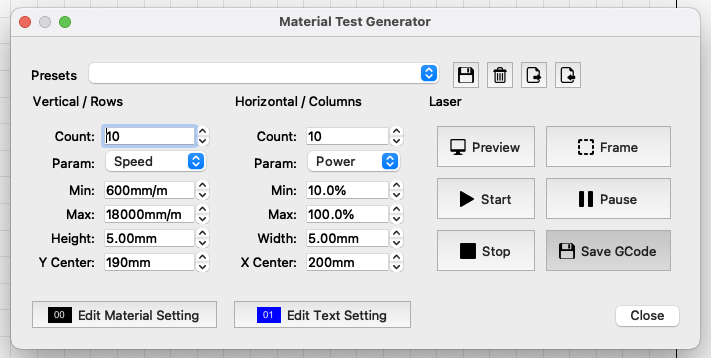
This will bring up the Material Test Generator window where you can select what parameters you wish to vary and the ranges over which you wish to test.

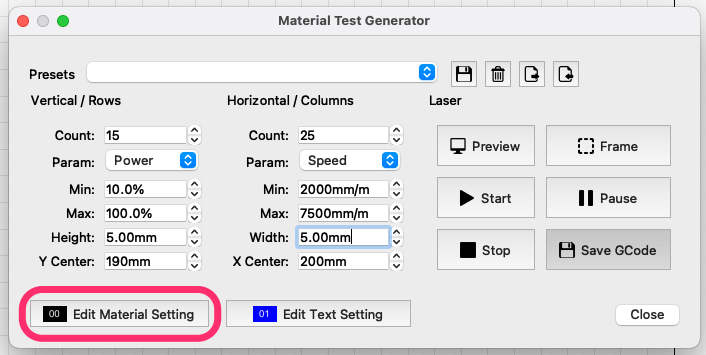
The default parameters, as seen on the image above are Power and Speed, but the full list for a diode laser is: Speed, Power, Interval, Passes. It is also possible to change how many steps (count) you have for each of the parameters you have chosen for your test matrix. The default is 10 steps for each parameter. The next image shows what I chose for my bamboo material test matrix.

In the test that I ran, I elected to change which axis Speed and Power were on, and I wished to have more steps for both Speed and Power. In previous bamboo material tests, on my Ortur Laser Master 3 with the LU2-10A 10 Watt laser module, I found that Speed played a more important role, and that Power, while definitely important, was OK as a coarser adjustment. As you can see in the above image, I added five more steps to the Y-axis (Power) and fifteen more steps to the X-axis (Speed) to give me a better view so I could fine-tune the settings I was looking to find.
To set up for a material test you also want to adjust the settings for laser beyond what you have chosen for the X-axis and Y-axis (Speed and Power in this case). To set the other laser parameters, click on the “Edit Material Setting” button.

This pops up the “Cut Settings Editor” window where you can make a ton of adjustments to the laser:

The settings visible in the above image are the default settings and what appears when the “Reset to Default” button is clicked. Out of habit I like to click on the “Reset to Default” for each new test I run to be sure that no changes from a previous material test are carried over to this test. I learned this lesson the hard way.
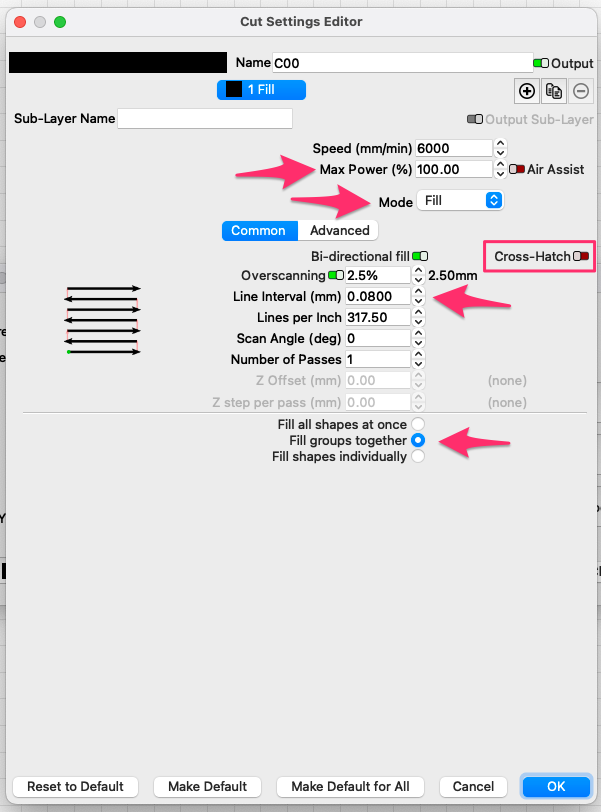
This next image shows which settings I altered for my bamboo material test.

Starting from the top, I set power to 100% (not sure it’s necessary, but just being safe); change the Mode to “Fill”; Make sure that Cross-Hatch is disabled; set the Line Interval to 0.0800 (or whatever you want for your test); finally click on the radio button beside “Fill groups together.” I made no changes on the “Advanced” tab. When done click on the OK button to take you back to the Material Test Generator window.
You will want to make adjustments to the “Edit Text Setting” Cut Settings so that the labels engraved on the test material are visible.

As you can see I made several changes: Speed is set to 1200mm/min, Power is set to 25%, and Mode is left at “Line”. The remaining settings are left at their defaults. I found that these settings made a nice mark on the test materials when I was running previous bamboo material tests (yeah, I ran a lot of them…).
At this point you will want to save the settings. Click on the floppy disk icon button and give the settings a name, then click on “OK”. This will allow you to reload them for use at a later time, or to use as a starting place for a new material test. The reason is that the steps after the Preview will require you to bounce back and forth between the “Move” menu for the laser, and the Material Test Generator.
To see what the material test pattern looks like and get an estimate of run-time, click on the “Preview” button.

Now, place your material on the laser table. I usually try to center my material in the working area of the laser, but you can choose anywhere you wish. Once you have the material in place and with the Material Test Generator window open, click on the “Frame” button. The laser will make a trip around the boundaries of the test matrix and labels showing you where the engraving will occur. Line up the boundaries as best as you can by moving the material, or changing the “Y Center” and “X Center” positions of the laser for the material test.

Finding the X and Y positions that work best for the material being tested is a trial and error situation. Make changes to the X and/or Y centers and then click on the “Frame” button again. When the optimal settings have been found for positioning the laser, it is almost time to run the test.
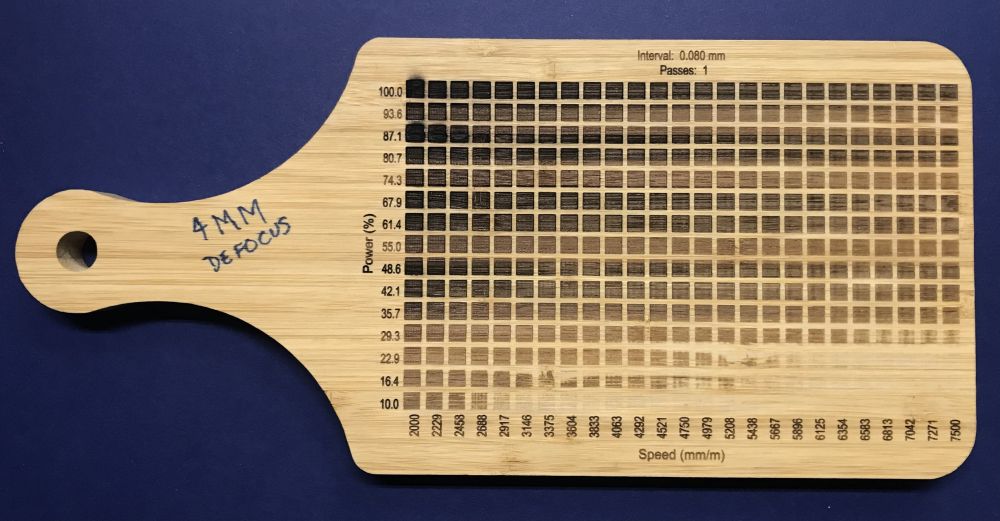
The final setting to be made or verified is the laser’s focus. More specifically in this case, it’s actually a “defocus.” For the bamboo material test I ran, I defocused the laser UP by 4mm. I did this by using an anodized aluminum spacer variously known known as a setup block, setup spacer, or height gauge. (I’ve included a link to the set I bought at the end of this article).
Once the focus has been set/verified and you are comfortable with the framing, it’s time to click on the “Start” button. When the test has completed you will have a Material Test that can be saved for future reference.

As you can see from the image above, the test provided a lot of information that is very useful. You can also see that I had to add some information by hand because there wasn’t an easy way to capture it when LightBurn created the material test.
From the material test results I selected three power levels and speeds (which just happened to be the same) to provide “light,” “medium,” and “dark” engrave settings. Using LightBurn I designed some filled blocks for the different settings, then put each one on its own layer, and assigned the desired Speed and Power settings to the individual layers. The defocus and line interval labels were on a fourth layer.

The final "test" result speaks for itself. I now have three settings I can use when engraving bamboo with my Ortur Laser Master 3 using the LU2-10A 10 Watt module. I encourage you to try this material test with your laser before selecting the Speeds and Powers that you will use for your projects. Every laser engraver and every laser module has different operating characteristics, and you will want to dial in the operating settings for the unique combination that is your laser engraving system. I know I frustrated myself using “canned” settings from other people, wondering why my laser engraving system didn’t produce the same results. In fact a few times the results were so far off that I was sure there was a problem with my setup. Nope, it was just the unique characteristics of the setup that I have, and I needed to adjust for it.
Thank you for following along. I hope this has helped you on your laser engraving journey.
Items I used (non-affiliate links):
